How to Make a Slideshow on Windows 8
Do you use Windows 8 and want to make a beautiful slideshow with music and effects? Or just a simple photo presentation for your studies? In both cases it should not be difficult, but searching for a suitable slideshow program makes you feel like in a never-ending battle of tools and websites, right? We know, we’ve all been there.
So, how to make a slideshow on Windows 8? Can you even make it without getting any additional app? Perhaps, although all the programs built into the Windows system are only capable of showing photos from a folder one by one. Can’t call that one a cool slideshow, can we?
Good news: you can make a great video of your photos pretty easily - just download a powerful slideshow creator made especially for Windows 8. There are lots of them, but we suggest checking out SmartSHOW 3D. It has a good mixture of extensive toolkit and ease of use, so you don’t have to be a tech savvy to make your slideshow. What’s more, you can save lots of time with the help of 600 templates & effects as well as 500+ royalty free music tracks.
In addition, it has a free trial version that you can test out on your desktop, and use to create your own slideshow. Ready? So, let’s dive into it.
Step 1. Download and Install the Software
First of all, download this slideshow software for Windows 8 from the official website. Use the button below to get SmartSHOW 3D right away:
After the download is complete, run the file and follow the installation instructions.
Step 2. Choose the Project Type
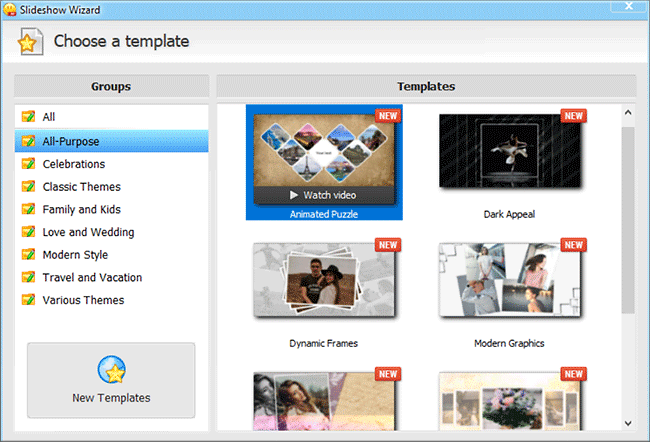
Launch the slideshow creator for Windows 8 and pick one of the options: New Project or Slideshow in 5 Minutes. If you want to make something creative and have plenty of time, then click New Project. Alternatively, let the program do all the work for you with the Slideshow in 5 Minutes option. We’ve decided to make a new project since we aren’t short on time.
Step 3. Make a Slideshow Video on Windows 8
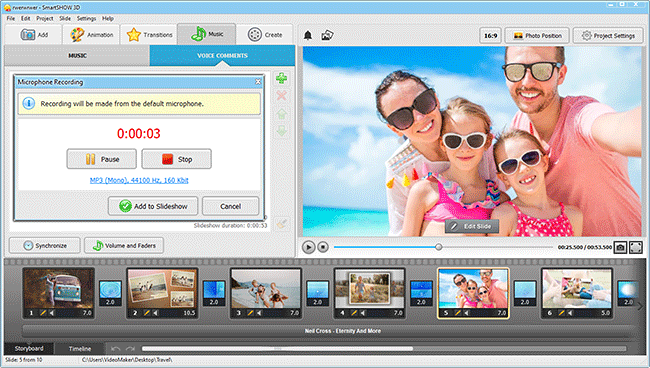
Find photos and videos on your computer and add them to the Storyboard. Want to change the order of the slides? Just drag & drop them to the desired place. If you need to create a slideshow with music on Windows 8, then switch to the Music tab and add your favorite song by clicking on Add music from file. Don’t have any particular tune on your mind? Choose a song from 500+ free tracks of different genres: folk, pop, latino, rock and many more.
Step 4. Play With Stunning Effects & Transitions
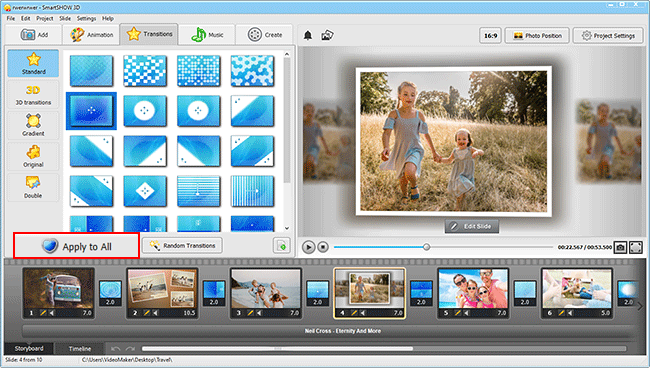
Now it’s time for some magic to happen. Go to the Animation tab to pick one of the 400 animation effects that come with the program and apply them to your photos. Choose a unique effect for each photo or click Random Effects to let the program choose the best options for you. The same goes for the Transitions tab.
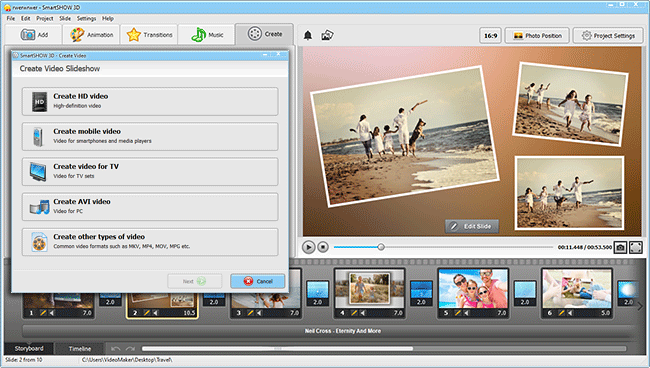
Step 5. Save Your Slideshow
You’ve done a great job! Now move to the Create tab and save your masterpiece. Here, you have three options: export the slideshow to your computer, burn it to DVD or make a video for different social media. Choose the option that suits your needs. So, now you know how to do a slideshow on Windows 8.
However, knowing the technical part of the matter is not the key. Making a memorable video is an art that has its own rules and hacks. We’ve prepared a list of useful tips any beginner will be able to put into practice.
Tips for Making a Slideshow Video on Windows 8
- Before you start creating a slideshow, you need to decide on the theme of your video. As you know, each event has its own atmosphere. Some are touching and romantic, while the others can be quite sad. If you’re making a wedding slideshow, use effects with hearts or flowers, put romantic music into the background. If you want to create a funeral slideshow, add a classical or religious track. Type in some meaningful texts to your slideshow to pay your respects to the deceased person.
- To get started, cull the photos you have. Don’t just drop all of your images into your video. There might be some unflattering shots which you should skip when you make a slideshow video on Windows 8. Pick only those photos that you like the most.
- Try not to add huge or a very small text. Find the middle ground. It’s not as easy as it may sound, but make sure the text is visible even to those people who are sitting far from the screen or watching it on a smaller device.
- Timing, timing, timing. If your images change too quickly, the audience won’t be able to take a good look at each photo. If it has some text on it, the viewer should have time to read it. On the contrary, long slideshows are too boring to watch. For this reason, the best duration for a photo is 3-8 seconds.
Ready to put this knowledge into use? Download SmartSHOW 3D and start creating!
Before you go, get inspired with some beautiful slideshow examples made with SmartSHOW 3D:


Congratulations! You have made it till the end. Now you have all the information needed to create a good-quality slideshow without wasting your time. Download SmartSHOW 3D, if you haven’t already, start a project and let your creativity flow.


Start now with SmartSHOW 3D!