How to Make a Cinemagraph From a Still Photo
What is a cinemagraph? It is a still photo in which a minor and repeated movement occurs, forming a video clip. Cinemagraphs are made by taking a series of pictures or recording a video, and turning them into a seamless loop of sequential frames with image editing software. This is done in such a way that partial motion of the subject (for example, a person’s dangling leg or flying hair) is perceived as a repeating or continued movement in contrast with the stillness of the rest of the photo.
Not quite a photo, not quite a video, these living images trick the mind into thinking it’s seeing something magical. Why not make a cool-looking cinemagraph with your own pictures? It's not hard to do - learn how to make a cinemagraph from a still image with our step-by-step guide. Ready? Let's dive in:
Step 1 - Make a Photo with a Transparent Background
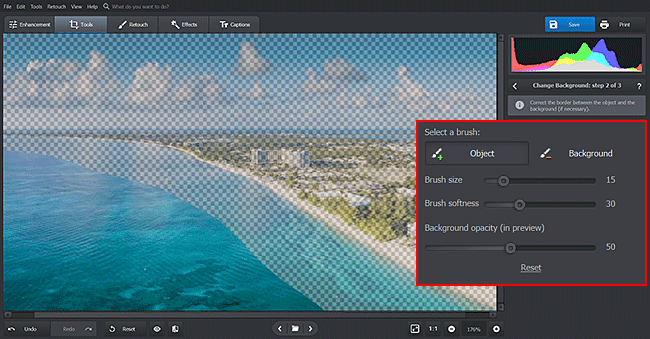
So how do you make a cinemagraph? For a start, you need to cut the area you want to animate from the initial photo and add it to a transparent background. You can do it in any image editor, but we chose PhotoWorks as it is incredibly easy to use. Launch the program and click Tools > Change Background. Grab the Object brush and mark the area you want to keep with the green color. Then switch to the Background brush and point out the area you want to remove. PhotoWorks will do its magic automatically. Click Next, then choose the Save with the transparent background and save your edited image as PNG for later use in a slideshow maker.
You can cut out the area you need with Photoshop as well. In this case, you can use Freehand Selection. However, cutting with this method will be a bit harder and take more time. You will need to make selection and background separation manually, while PhotoWorks will do everything automatically after you make a few brush strokes.
Step 2 - Blend the Initial Image and the Cut-Out Together
Now it’s time to put your initial picture and the photo you’ve edited together in an animated slideshow maker. We recommend that you use SmartSHOW 3D. Unlike most basic slideshow apps, this program lets you work with layers and masks. Add the initial photo to the Storyboard and click Edit Slide. Make sure to stretch the image to get rid of black borders. Next, click Add Layer > Photo and carefully place the picture with a transparent background over the first photo.
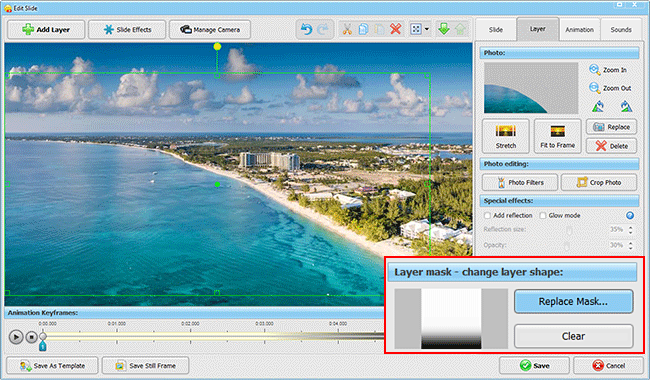
If you can still see an edgy border between the old and new images, select the second photo copy and apply a mask to it. It’s better to use some gradient masks available in the program as they help to seamlessly blend two images together.
Step 3 - Animate the Still Water in Your Picture
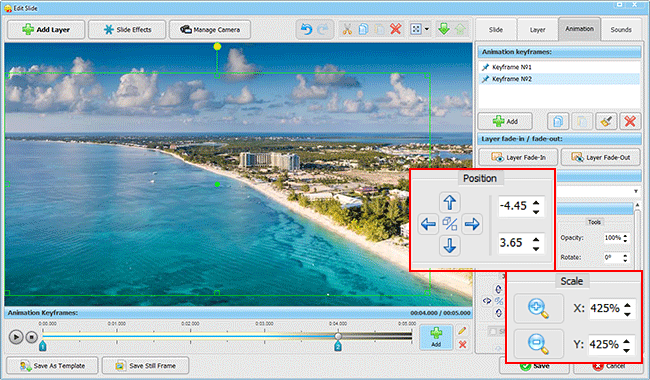
Switch to the Animation tab to create the effect of swashing waves. Add a new keyframe and position it in the end of the timeline. Use the arrow buttons to move the second photo copy to the right. Click Magnifying Lens to increase its size. As a result, the cut-out area depicting the water will gradually move over the slide and become bigger. Preview your cinemagraph from still images and change the slide duration to make the water motion smoother.
There’s a variety of ways to add some depth to your photos. For example, try adding a zoom-in effect to still images. It can be a classic zoom-in or a more elaborate effect accompanied by a 3D flip. Experiment with animation settings to showcase your pictures in a unique manner!
Want to see what we came up with? Check out this video showing different examples of cinemagraphs. Dive into the ocean of inspiration and grab some ideas for your own projects:

Feel inspired and have lots of fresh ideas in mind? Download SmartSHOW 3D using the button below to start creating cinemagraphs from your photos right now:
Need a bit more of dazzling cinemagraph ideas? Below we’ve gathered several examples of animated photographs you may want to use in your own projects.
🎬 Nature-Inspired Cinemagraph
Landscape photos make perfect cinemagraphs as it’s much easier to cut out a tree branch or select some water area than work with the subject’s hair. Here you can see grass waving in the wind. You can also animate clouds, raindrops, fog, waves and other natural phenomena in your pictures to give them more dynamics.
🎬 Harry Potter-Like Moving Portrait
It is a good idea to make a cinemagraph from a still image depicting a person doing something. That way you will manage to capture simple movements like one’s leg dangling or a hand turning pages of a book. It can also be a simple portrait where the model steadily opens and closes their eyes, and instantly draws the viewer’s attention to this living photo.
🎬 Animated Photo Card for One’s Birthday
Who says you can’t make a cinemagraph for a special occasion? For example, take a photo of a birthday cake and animate the fire of its candles - make them steadily glowing on the shot or dancing like an invisible celebrant tries to blow them. Share this moving birthday card with your family or friends to make them even happier on this special day.

Once you’ve created the cinemagraph of your dreams save it as a video file or make it a part of another photo project. With SmartSHOW 3D, you can also spice up your cinemagraphs with other stunning effects like zoom-in, 3D camera animation or highlights to imitate real-life sun rays. Get creative and share your works online!


Start now with SmartSHOW 3D!